Sunday, March 31, 2013

One Month Photo Challenge

Hello, friends!

I have something fun for anyone to try!

Some of you may have seen photo challenges like "31 Days on Film" or "'This Month' Photo Challenge." I know I've seen them on Pinterest and I've watched as Facebook friends participated in series of them. I like the idea, but I wanted mine to be less a chronicle of my everyday life and more a schedule to practice photography. You know, a reason to go out and take a photo every day and get some practice. As any professional and hobbyist photographer (I am the latter, for sure) will tell you, the best thing you can do for your photography is to practice. 

I found a March photo challenge via Pinterest. It had some flaws, for example it was missing a day... So I decided to make my own! Haha!

I have created an easy to follow calendar, below, that can be performed any month. It has 31 days of photo prompts, but you can do 30 if the month is a short one. When I did my challenge, I tried my best to accomplish one a day, but some days I just couldn't fit it in or the photo I took that day was not up to my standards. And then there were days that were great; I had great lighting and I was feeling inspired! The point of the challenge is to give you a reason to practice, so if some days you don't get to it and other days you are crazy prolific - that's great! Just try to get all 30 or 31 items taken care of before the end of the month!

Also, this is your practice, so you don't have to do them in order. You can print out the calendar (.pdf here!) and cross them out as you accomplish them. :) It's flexible, easy, and fun!

So April starts tomorrow!! Get shooting!


Below are some of my favorite shots from my March 2013 Photog Challenge!

Happy Easter, my friends.
Stay excellent!

- Jenny -

Animal Portrait - "Amber"
Abstract - "Death"
Flora - "Awakening"
Something Huge - "La Luna"
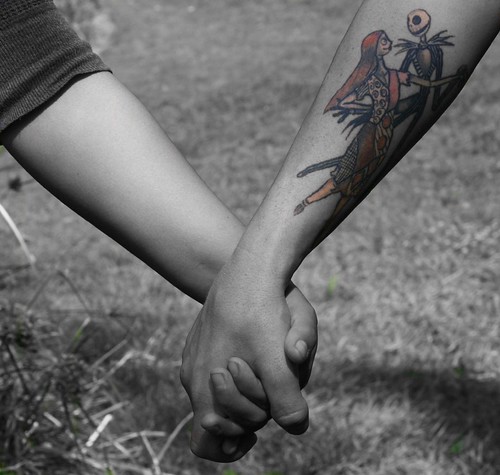
Low Angle - "With Persona"
A note about the last picture. "Persona" is the name of this wind vane. It's a kinetic sculpture found on the Washington State University Pullman campus, atop the libraries, that sings when the wind moves it. Learn more about its dedication here and here is a recording of its singing. Awesome, right?

Sunday, March 24, 2013

Food Adventures: Pumpkin Chocolate Swirl Cheesecake

Hello, friends!

Guess what, guys! I made a cheesecake! :D

Mr. Kyle requested a cheesecake for his sweet this weekend. His one detail in the request was that it have pumpkin in it. So I went to the interwebs for a pumpkin cheesecake recipe. I found this one by Paula Deen (so you know it's good), but I decided that I didn't want to follow the recipe all that closely. I wanted to live dangerously. ;) And I wanted to get some chocolate in there, because pumpkin and chocolate are a beautiful couple.

I practically didn't follow this recipe at all... except for the the crust, which was a great crust recipe.

So here's my cheesecake recipe!

Pumpkin Chocolate Swirl Cheesecake


Ingredients

For Crust:
  • 1 3/4 cups graham cracker crumbs
  • 3 tablespoons light brown sugar
  • 1/2 teaspoon ground cinnamon
  • 1 stick melted salted butter
For Filling:
  • 1 cup milk chocolate chips
  • 1 cup semi-sweet chocolate chips
  • 3 (8-ounce) packages of cream cheese or Neufchâtel cheese (1/3 less fat), room temperature
  • 3 eggs plus 1 egg yolk
  • 1/4 cup sour cream (or light sour cream)
  • 1 1/2 cups sugar
  • 2 tablespoons all-purpose flour
  • 1 teaspoon vanilla extract
  • 1 (15-ounce) can of pureed pumpkin
  • 1 teaspoon pumpkin pie spice\

Directions
  1. Preheat oven to 350 degrees F. 
  2. Follow the "For crust" instructions from this recipe
  3. Get two double boilers (or two small pans of water with glass bowls that fit over them to work as double boilers) ready to melt chocolate. 
  4. Place 1 cup of milk chocolate chips in one double boiler to melt and place 1 cup of semi-sweet chocolate chips to melt in the other double boiler. 
  5. Melt the chocolate and let cool slightly, so it is not hot, but not to the point where it begins to harden. 
  6. While the chocolate melts, beat cream cheese until smooth. 
  7. Add eggs, egg yolk, sour cream, sugar, flour, and vanilla. 
  8. Beat until well combined. 
  9. Scoop two cups of cream cheese mixture out of the "mother" mixture and divide into two small bowls, one cup of cream cheese mixture into each bowl. 
  10. Mix the melted and cooled milk chocolate chips into the cream cheese mixture in one of the two small bowls that contains one cup of cream cheese mixture, until well mixed. 
  11. Repeat with the semi-sweet chocolate and remaining small bowl of cream cheese mixture. 
  12. Beat 2/3 of the can of pumpkin puree and the pumpkin pie spice into the remaining cream cheese mixture (the mother mixture).
  13. Pour half of the pumpkin cream cheese mixture into the prepared crust and spread evenly. 
  14. Dollop the milk chocolate cream cheese mixture into the pumpkin mixture in the crust, making spots in the pumpkin mix like you would see on dice. Use a knife to swirl the chocolate mix around. 
  15. Pour the remaining half of the pumpkin cream cheese mixture into the crust, spread evenly. 
  16. Dollop the semi-sweet chocolate mixture into the pumpkin mixture just as was done with the milk chocolate mixture. Use a knife to swirl the chocolate mix around. 
  17. Place in the oven and bake for 1 hour. 
  18. Remove from oven and let sit for 15 minutes. 
  19. Cover with plastic wrap and refrigerate for 4 hours or overnight. 
There you have it!!


I made mine with the lighter version of the ingredients, just to save some calories and fat. It was delicious! The pumpkin and chocolate are SO GOOD. I hope you enjoy it! I know we did!

Until next time, friends!
Stay excellent!

- Jenny -

Saturday, March 16, 2013

DIY: Wood Burned Drumsticks

Hello, friends!

I am back with another wood burning post. As you may have read from my previous posts about the wood burned storage box and my calendar journal, I really enjoy pyrography. I've only been dabbling in it for about a year and a half. There's still a lot to learn and practice! For example, I have yet to try to transfer my drawing skills (like shading, crosshatch, etc.) to wood burning like some have done to create beautiful artwork. That is on the to do list, though. I'm thinking that this coming year of life, I'll take a stab at burning a plaque in place of drawing with graphite, you know what I mean? I think that will be quite the adventure! :)

Anyway!

For a best friend's birthday, I decided to do a wood burn project. I have found that these projects really go over well. They're unique and often have a practical use - like the storage boxes. This friend of mine plays the drums and, in my opinion, is really great at it. I've seen him play just for kicks as well as on stage and it's quite a thrill to watch. I'm not sure if I've ever told him so, but I admire his talent quite a bit. Heh, maybe he'll stumble on this post one day. :) I decided to wood burn a pair of drumsticks for him - I know that drumming is one of his passions and thought that this would be a great gift.


You'll have to forgive the picture quality - I worked on these during the evenings after work, so natural lighting was not available and I was in a bit of a hurry, hence my cluttered desk in the background. :P

Above is a photo of the drumsticks as they were when I bought them, save for the pencil line.
I wanted to keep the design simple. The thought of doing a collage of graffiti-esque images all over crossed my mind, but as I mentioned before, I have not honed my wood burning skills and that would have been quite the undertaking. O.o

So clean and simple it was!
Below are some shots after I was finished.


And a bow to top it off!

I was pleasantly surprised to find that the drumsticks took really well to wood burning. I was afraid that they wouldn't take the color well. I decided to leave the drumsticks raw, without any stain or lacquer. One of my favorite things about picking up a pair of drumsticks is the feel of the bare wood grain; my favorite thing about picking up a pair of used drumsticks (before they are broken) is the feel of the wear - It's like you can feel the beat and rhythm in them. Maybe that's just me though... I am a little mad, not quite as mad as a hatter... but still. ;) 

For those interested, I used a mini flow point for the outlining, the name, and my initials on the end of the sticks. I used a shading point for the solid fill on the ends and for the triangle pattern. 

Until next time! 

Stay excellent!

- Jenny - 

Saturday, March 9, 2013

Hakuna Matata

As you might have guessed from my To Infinity & Beyond post, I am a Disney kid. I love me some Disney. My favorite movie of all time (not just favorite Disney movie) is The Lion King. It is closely followed by another Disney movie, The Nightmare before Christmas. I can't get enough of them.

I have been to Disneyland twice and Disney World is on the life to-do list.

Not only do I love the movies and the amusement parks, I love the lessons and attitude of Walt Disney and those that were instilled in the classic movies. It's truly inspired.

I stumbled upon a Hakuna Matata ring on Etsy. I pre-ordered because it was so reasonably priced. I received it this week! Look!


Adorable, right?

Ever since I fell in love with The Lion King, I have made hakuna matata one of my life mottos. I adore this ring and the seller was gracious enough to indulge my indecisive nature and give me both the infinity symbol and the heart. The ring usually only comes with one symbol on the inside of the band. It was a great Etsy experience. :)

Here are some other Disney items that I have been gawking at on Etsy:


  1. 8 X 10" Walt Disney and Pixar posters set
  2. Disney pillow
  3. The Lion King minimalist poster
  4. Disney Pixar Up Themed greeting card
And of course, in keeping with my last Etsy post, here are some great Disney inspired tattoos. I don't know if I'd ever seriously consider a Nightmare before Christmas tattoo, but I have considered the "Remember who you are" tattoo. :) 

(link)

(link)


From Winnie the Pooh and Snow White to WALL-E and Mulan, I love Disney. 
Hope you are doing well, wherever you are! 

Stay excellent! 
- Jenny -

Friday, March 1, 2013

9 in 5 by 23

I follow a blog called Wit & Whistle. I love this blog. In fact, it was after discovering this blog and reading all of the posts that I realized that I would love to blog and that I could do it. She is so creative and fun, but also so accessible. I could totally relate, even if I was a little jealous of her life. ;)

Anyway, she posted about this idea of writing a list of things that you would like to do within a year of a single age. The lists contain a number of tasks that matches your current age and you are to finish them before your next birthday. She just finished her first list and had her birthday and has begun another. It's like a "bucket list" for a single year of life. I love this idea. I have loved reading the various posts about her progress and I've been inspired to do my own.

I, however, am just under 5 months from my next birthday. I turn 23.

So I have started working on my "23 by 24" list. While I was thinking of tasks, I had a lot come up that I wanted to get started on (and could even finish) before my next birthday. These obviously either couldn't or shouldn't be on my 23 by 24 list so I got to thinking, maybe I should start a shorter list right now!

I thought of this idea on February 26, 2013, which is exactly five months from my 23rd birthday (can anyone say "destiny!"). So, here was my train of thought:
I have exactly 5 months til I turn 23. I would have had a "22 by 23" list had I started one this past birthday. Here's what I figure: 
(22 tasks / 12 months) = 1.833 tasks/month
1.833 tasks/month x 5 months = 9.166 tasks ~ 9 tasks.
So I will write a "9 in 5 by 23" list!! 
(Talk about nerding out and using unit analysis on this computation - such an engineer... O.o) 

  1. Become proficient at driving a manual transmission.
  2. Turn the Magic Tree tea shop box into a jewelry box.
  3. Go through and organize all of my old 35mm prints.
  4. Take couple's photos with Kyle throughout the Palouse.
  5. Go through the books in the garage: donate vs. keep.
  6. Do Wild at Art in Moscow, ID. 
  7. Take a trip (not including to Seattle or to anywhere in eastern WA)
  8. Do at least 30 min of cardio 3 times weekly.
  9. Go through my closet: donate vs. keep and determine at least 3 common traits of my favorite items, try to buy more items that suit my personal style instead of items bought on a whim. 
I'm starting off this habit of a year of life to do list, taking it a little easy. I expect a lot of changes between now and my birthday. With these changes and other things, I want to keep my goals pliable to ensure that I maintain one of my favorite personal character traits - flexibility. 

But my "23 by 24 list" is going to be even more awesome, I can already tell! ;) You'll just have to wait until my birthday to hear what I've got planned for the year! 

What do you think? 
What would you do? :D

Even if you don't make a list or need a list - I hope you are constantly looking to do things that you want to do and not always the things you have to do. ;) 

Stay excellent! 

- Jenny -