Monday, December 24, 2012

A DIY Christmas


Merry Christmas everyone!
I can't believe it is already Christmas eve and that we are about to hit our one year blog-i-versary.
It hasn't been the perfect first year of blogging, but it has been fun and I have enjoyed it. I look forward to continuing and, hopefully, improving.

This year was my first Christmas without school... ever. So I decided to use the opportunity to DIY more things for Christmas. I usually DIY gifts (as you may have noticed throughout this year..), but this year I decided to do more than in the past. I painted three mugs (and used clear coat to increase the lifetime of the paint, as I updated in the DIY painted mugs post), made a good number of baking soda and corn starch ornaments, and made peppermint fudge and mocha truffles.

Everything turned out really well!

First, the ornaments!
I used this baking soda and cornstarch clay recipe. I followed the directions and they turned out pretty well. Some of my ornaments experienced some cracking on the back, but it wasn't enough to make me hate them. I think it may have been slightly due to how long it took me to get from rolling the dough to baking the ornaments. To poke the holes in the top, I used a straw.

Once the ornaments were baked and cooled, I painted them using acrylic paint. Once the paint was dry I coated both sides with a clear varnish that I found in the same aisle as the acrylic paints in my local craft store.

Red Hot Chili Pepper symbol for my 'brothers' to commemorate our RHCP concert experience this November.
These were made for my boyfriend's parents. They are painted to look like their dogs. :3

This is a pair of matching ornaments. One I made for myself (the one with the funny business near the top of the star) and one for Anna! :)
That's right, the deathly hallows = awesome.
And this is one of my personal favorites - The one I made for my man. :) <3


On to the candy!
I decided that I would make some candy for my boyfriend's parents in addition to their ornaments. I settled on these two recipes: peppermint fudge by Shugary Sweets and mocha truffles by Better Homes and Gardens.


These turned out fairly well. They weren't as pretty as I was hoping but they sure are tasty. I had to fudge some of the ingredients though (pun intended). The fudge recipe calls for Andes peppermint crunch baking chips, but I could not find any and I checked three grocery stores. So I used Hershey's candy cane flavored kisses, they have little bits of candy cane in them too, so it worked out great! Also, the topping with the peppermint marshmallows and candy quik didn't pan out (couldn't find peppermint marshmallows and accidentally melted the marshmallows in the candy quik the first time...), so I used white chocolate and regular marshmallows. It's not as bright white but it's tasty and it works. :)

As for the truffles. They are delicious and they turned out well. We were running a little low on time so we were less patient than needed to deal with coating the truffles in white chocolate, so we ended up with swirls of dark chocolate in the coating from the insides melting a bit. But they almost look like they were made to look that way. ;)

Overall, it was a success and it's all quite tasty!


I hope you all have a great Christmas. I'll be back before the week is out with a post for the new year!
God bless and may your holiday be filled with love, family, friends, and warmth.

Stay excellent!
- Jenny -

Wednesday, December 12, 2012

Ferrets 101

Hello friends!
It's been much, much too long. I'm sorry for that.
Today, I'm going to share some overview information about one of my favorite pets: ferrets.

Now, I'm a dog person. I love dogs. But at the end of the day, I just love animals. It's pretty outrageous sometimes, how much I love animals. If I had more resources and time, I would be the crazy lady that pretty much has a zoo and has to have special permits for the number of animals.

Having said all of that - I love ferrets, too.

The summer following my freshman year of college, my boyfriend and I started dating, and just so happens we had already made plans to move in with one another and two other friends into an apartment. He and I both love pets. He's had lots of pets in his life too. We read the lease when we signed on for the apartment and it said (paraphrasing): "No dogs. Cats can stay (maximum of 3 cats) and require a pet deposit. Caged animals are okay; no deposit necessary." He's not big on cats but we still wanted a pet. He brought up the idea of getting ferrets and I was inexplicably excited by the idea. You know how you can tell if I'm really into an idea? I research everything that I would need to know in order to make an educated decision regarding it.

So that's what I did. I wanted to read up on the care of ferrets, their temperaments, their needs, costs, where to get them, what references would be helpful - pretty much EVERYTHING about the little fluff-butts.

In all of that research, I decided that they sounded like a practical pet decision for college students and not only that they sounded like enjoyable, adorable, and fun little loves that people build loving and rewarding relationships with. And after having ferrets for about 4 years, I have to say that my decision and intuition about these creatures was SPOT ON.

So here's a quick overview about ferrets. I'll debunk a couple common myths about ferrets. I'll explain their traits and basic needs and I'll direct you to more information.

My ferrets not long after I got them. Bella (~1 yr.) on the left, Bear (~2 yr.) on the right.

Myths

Ferrets are rodents.
No. Ferrets are not rodents. They belong to the family Mustelidae, commonly known as the weasel family, and are most closely related to the polecatAny reputable source about ferrets will tell you that they are NOT RODENTS (the link is the best resource for ferret information, no joke. 90 reviews on Amazon with a solid 5 star rating. More on it below). 

Ferrets stink. 
Not necessarily. Yes, ferrets have glands that secrete a musky scent. They use this for marking territory and communicating with other ferrets. Male ferrets are particularly musky in my experience. BUT this muskiness is NOT that strong. When people ask me about the smell of a ferret, I always compare the magnitude of it to that of a dog. Now be honest, how good does your dog smell usually? The answer is, your dog doesn't really smell good, except after a bath. Otherwise, your dog smells like a dog. Ferrets are the same. They have a smell but they don't stink.
Now, you may be thinking what about the cage and the litter? Valid point, my friend. If not properly and regularly cared for these things will indeed stink, just like a cat's litter box and a dog's bed will stink if not properly and regularly cared for. But if you scoop the litter often (timing depends on how many ferrets you have, the size of the litter box, and the quality of the litter) and clean the blankets etc. regularly - stench isn't a problem. 
Final answer for this debunking: just like any animal (or person), if not properly cared for a ferret will stink, but if you are a good ferret owner and do your job well, your fuzzy won't stink any more than Fido. 


Ferrets 101: Care & Love

So I'm not going to give you a detailed run down of how to care for and own a ferret. If you're really interested, I direct you to THIS BOOK. Don't let the series of the book fool you, it is the BEST reference for all that you need to know about ferrets, from choosing one, preparing for its welcome into your home, housing, and feeding to breeding, old age, dealing with a death in your ferret clan, and illness. It has SO MUCH great information. Pretty much everything you need as a fuzzy owner. Any other questions should just be directed to a veterinarian, because I'll doubt you'll find it in a regular book. 


Here are some basics:
  • Ferret food: Ferret/Kitten Food of at least 32% protein from animal sources & 22% fat is approximately what you're looking for. Remember ferrets are carnivores, they can't be fed dog food because dogs are omnivores and have much more plant base in their diet than cats or ferrets. Now, the book has more information on what to feed your fuzzball, but the main piece of advice I have is read the labels. You're looking for the key things above especially. You'll find that there are ferret foods sold in pet stores like Petco and Petsmart that don't meet these and other important nutritional requirements (so they sell you supplements). For the health of your ferret, read the labels and find a food that covers most if not all of their nutritional needs. Then look into supplements. For example: I've fed my ferrets Iams(R) Proactive Health Kitten food (33% protein and 21% fat, pretty close to what I'm looking for). It covers the needs and is affordable (important for a young college student or recent college grad). I also know that EVO ferret is also a great diet for a ferret, but it is more expensive. Ferrets don't eat much (compared to other common pets) so it isn't much of a financial pinch, but look at your situation when you pick a food. I also use Furo-tone as a skin & coat nutritional supplement, Furo-vite as a treat mostly (but it is a vitamin nutritional supplement), and Ferret Lax (a hairball and obstruction remedy/preventative measure) as a measure to maintain healthy digestion. Sounds like a lot, I know, but the costs are very manageable and they love these supplements so it's a highlight in their day, like treats for a dog.
  • Ferret cage: They'll need a cage to live in. You can get great deals on used cages. Be sure to pay attention to the size of the cage with respect to how many ferrets you have. Also, the book explains that you should always have at least one more sleeping location than you have ferrets. I line the bottom story of my cage with something like this, a natural paper pulp pet bedding (also suggested by the book). I was able to find a cheaper brand at a local pet store, so I don't use CareFresh, but it's the same product. The litter box is also on this story of the cage. I fill mine with Pet's Preference Original Texture. It's absorbent, odor fighting, and it doesn't have a lot of dust (important for your and your ferret's health). I love the stuff. Also, very affordable. Now the fun part - sleepy and hidey holes! The ferret industry has tons of adorable sleep sacks and hammocks for your fuzz. I have a pirate ship (my ferrets love it), a hammock, and a sleepy sack. And what's ever better, it's very easy to make your own hammocks and blankets and sleepy sacks if you just know how to sew or have a sewing machine. :) 
  • Ferret play: Ferrets are very smart. They are very curious. These are the first two things I realized about them. Because of this, if they want something, they WILL get it. They will climb up and onto things you thought were impossible for them to reach. They will steal your shoes if it suits them. They are indeed little misfits full of mischief, but that's part of the fun! I like to hide things they like for them to find. They also are very interactive with you! You are the best play thing. Mine have chased me, "played tag," wrestled with me (my hand), and treated me like they would another ferret. I adore it. You can also train them to do tricks and they pick up on it pretty fast (well... some do). I've had two. My girl Bella is SUPER smart, almost too smart. But the boy Bear, was a little slower. But that's just the way it is! Every ferret is different - they have BIG personality stuck in those little slinky bodies!


Where to Get a Ferret

This topic won't take long. The answer is: a shelter. ADOPT. 

I am a big supporter of all animal shelters. For every pet you see in a store there are dozens more that have been abandoned, lost, found, or forgotten in a shelter. Ferrets are no different. In fact, in my region there are a few shelters that are solely dedicated to ferrets. Please, if you're looking to get a ferret, look to adopt one. 

The truth of the matter is (and you can read about this in the book and other sources), most ferrets you come across came from the same place: a Marshall ferret farm. If you look in any ferret aisle at the pet store, many of the products are made by Marshall. We have a Marshall cage. It's quite the monopoly they have. The products aren't all bad (they're not all great either, be smart when buying), but they are the biggest breeder of ferrets. There are some private breeders but not many. Any ferret in a pet store and many of those in shelters are Marshall ferrets. And you can check a ferret for the Marshall ferret tattoo. It's a set of dots tattooed in one of their ears. My Bella has her tattoo, it's easy to see since she's a silver roan. So, no matter where you get your ferret, it'll probably be a Marshall ferret. I say get a shelter ferret because they need a home and the shelter needs more room. Also, the shelters always take great care of their animals. They care for and nurture them to health and often include vaccinations and spay/neuter, both very necessary and responsible things. The ferrets from shelters are healthy and in need of a good home. Think adoption first. 

Hope you enjoyed learning a bit about ferrets. I know it was a doozy of a post, but it's been a while since a post went up (and I love ferrets). I think that if more people knew about ferrets, they'd be a more popular pet choice. But even since I've gotten them, I've noticed a much higher interest in the animals. Hopefully, the interest will result in more understanding and more ferrets in homes, not more in shelters. If anyone has any questions about ferrets, I'd be happy to answer or direct you to a good, reliable source for info. :)

Take care! 
Until next time, friends!
- Jenny -

P.S. Enjoy the following pictures of my ferrets! 


Tuesday, November 6, 2012

A Lil More Halloween - Local Haunts

Hello, friends!

I know that it is past Halloween and that Thanksgiving is just around the corner, but I thought I'd post once more about Halloween. It is tied as favorite holiday (I have a really hard time picking favorite times of the year, if you couldn't tell with seasons. The same difficulty is there with holidays... Don't judge me!).

This season I was able to make it to two local(ish) haunts. I think that local haunts and community events are the perfect thing to do for the Halloween holiday. They are so wonderfully creative and are often built on the ideas and hard work of community members, making them all the more special.

In the metropolis that is the Tri-Cities, WA (Kennewick, Richland, Pasco), we had a good handful of little haunts going on. I unfortunately was only able to make it to one due to work and my weekends away, visiting the man. ;)

One that I wanted to visit was the Haunted Forest in Sacajawea State Park. Maybe I'll get the chance next year! The local haunt I did get a chance to visit was Terror behind the Screen.


This attraction is based on scenes from well known horror flicks like Dawn of the Dead and Hostel. The square-footage seems small but they packed a lot in there. The actors are very convincing and the anxiety factor goes wayyy up right out of the gate with the entry through a tight canal through which you need to squeeze to enter the attraction. It was very claustrophobic and disorienting! The actors get really close to you and are very interactive and free. In other attractions, I have found that the actors often stay within their "area" but some of these actors seemed to go beyond the expected boundaries, creeping after you to frighten you again. 

Other than that attraction, I also attended Scarywood (presented by Silverwood) for my second year. Silverwood theme park is an awesome place during the regular season, but I have to say Scarywood is pretty damn awesome too! They have multiple haunted houses/walk-throughs and their train ride is tricked out for the Halloween season. Not to mention the roller coasters still run and that all merchandise is 50% off, including the Scarywood stuff! Timber Terror runs with the cars on backwards for the event! My cousin Megs and I didn't get a chance to go before Halloween itself, but they were open the weekend following so we went this past Saturday.


The train ride is the Zombiewood Express, a zombie hunting train ride for 17+ years of age. Hilarious scripting, fairly amusing sights, loud gunfights, foul language, drug references, and a little bit of sex and Southpark - What's not to LOVE?


Throughout the park, while you're traveling between attractions you will be ambushed by all sorts of creatures, such as this beauty. There were also scarecrows, werewolves, and porcelain faced doll-people. Always keeping you on your toes!


This was an attraction that I didn't see last year, a 3D haunted house, 3Dementia. It was very psychedelic and neon - I loved it! And the rooms of doors at the end had my heart racing!


There's A LOT more than just these things at Scarywood, I hope they make enough profit to justify continuing with it. It's great! It is definitely worth a drive out there to have a night of scares, food, and cheap merch!

Happy Halloween, friends - off toward Thanksgiving and Christmas!!

Love to all.

Stay excellent!
- Jenny -

Friday, October 26, 2012

DIY: Calendar Journal Update & Hand-Painted Mugs

Hello, friends!

Sooooo... do you remember the first thing that I ever posted about? I finally stained and finished the calendar journal box! Here it is - two coats of a new color from Minwax (I think it's called Classic Gray) and two coats of poly!


I technically finished this in August and am now just getting around to posting about it. I know, aren't I horrible? Well to be fair to myself, I've had a lot going on since graduation in May. A 40 hour a week internship from May to August, a wedding that invaded all of Labor Day weekend, a new full-time position at 40 hours a week, and studying for the Fundamental of Engineering exam (which I spend 8 hours taking tomorrow... fun stuff). All of that is also why I've been so horrible at posting often - I'm supposed to be posting every week but... You know how it goes. Life. It's crazy. But I'm here for you! Promise, I won't forget about you!

After the design was burned, all it took was a couple coats of stain and couple coats of poly. And voila! I went for a weathered and uneven look, so that's why the color isn't evenly distributed. I think it turned out well. And congratulate me, I have been keeping up on the journal all year. :)

So on to the DIY project that I've got for you!
It's another gift that I like to give fairly often. Though my favorite is to paint ceramic before it is fired, like you can do at some of those shops (we used to have a local one called Artsy Fartsy, loved that place). You can customize any mugs or ceramic that you can find in the stores, like Target, with ease!

I have done two of these gifts in the past three months.
The instructions are a lot like the hand-painted glassware tutorial.
Oh and for any of you who think that you should try the Sharpie method you've seen on Pinterest - Keep in mind that though that method is quick and easy, it isn't dishwasher safe and even with hand washing it will eventually wear away. It's not permanent. This method is much more permanent (but as with even mugs you buy in stores, chips and cracks and wear do happen over time). Even though this method is meant to be more enduring than the Sharpie method, it is still recommended (by me) that any hand-painted mugs be hand washed to ensure longevity. 
:)

  1. Buy a ceramic piece. I love mugs. I bought a couple of plain, white, square coffee mugs at Target at very reasonable prices for a wedding gift. I also was able to find a great cappuccino mug at JCPenney for $4. Pretty nice, if I don't say so myself. 
  2. Wash your piece and remove all price stickers.
  3. Dry completely. 
  4. Paint!! I used Folkart's ceramic Enamel (shown below), which I bought at Hobby Lobby. I tried Micheal's first but they were in the middle of phasing out all other ceramic paints and phasing in the Martha Stewart collection paints. So Hobby Lobby got my business. They were $2-3 per paint and I've got plenty left after two projects to paint a lot more!! 
  5. Follow the instructions to set the paint. My instructions were to let dry completely, then set in a cool oven. Set oven to 350 degrees F and bake for 30 min. Allow to cool in oven. 
  6. In my experience of painting a few sets of mugs, I have found that the paint still has a tendency to chip pretty early on in its lifetime. To help prevent/mitigate this, I have started putting a clear coat glaze for glass and ceramic over the top of the set ceramic paint. The product I use is the same as the one that I used for the hand-painted high ball glass. (Updated: 12/13/2012). 

It's quick and easy and has a ton of possibilities for personalizing! Here are the two projects that I did: a pair of mugs for a wedding and a mug for a birthday. :)


Have you ever painted unfinished ceramic? Where do you like to go to get it done? 

Happy crafting! Talk to ya on the flip side!
Stay excellent!
- Jenny - 

Friday, October 12, 2012

Falling for Autumn: Decor & Food Adventures!

Hello, friends!

Man, it feels like only yesterday I was telling you about how much I love July, but here we are! It's nearly the middle of October!!

Something that you'll learn about me is that I don't really have a favorite season.
My favorite thing about the seasons is when the change. I love each season for a different reason and I am always excited about the next one. By the time we have gone through a season and the next one is about to come around, I'm super pumped for it.

So here, I am going to talk about my deep love affair with fall. <3

There's soooo much to love about autumn. The beautiful scenery, the chilly nights and crisp air, the pumpkin everything, Halloween, Thanksgiving, family time, the renewal of the appreciation for warmth... all of it!

In celebration of arguably my favorite holiday (I have a hard time picking a favorite holiday too --- don't judge me!), my boyfriend Kyle and I decorated his apartment! Being fresh out of college paired with a college student, we needed to do our decorating on a budget. Here's how we did! :D

Copyright(c)JennyK.
This cute little ghosty is a tea light candle holder. Found at Wal-mart (he was the last one!) for $3. Awesome. 
Copyright(c)JennyK.
Copyright(c)JennyK.
Lighted spider web - $7.97 (plus tax) Wal-mart. 
Copyright(c)JennyK.
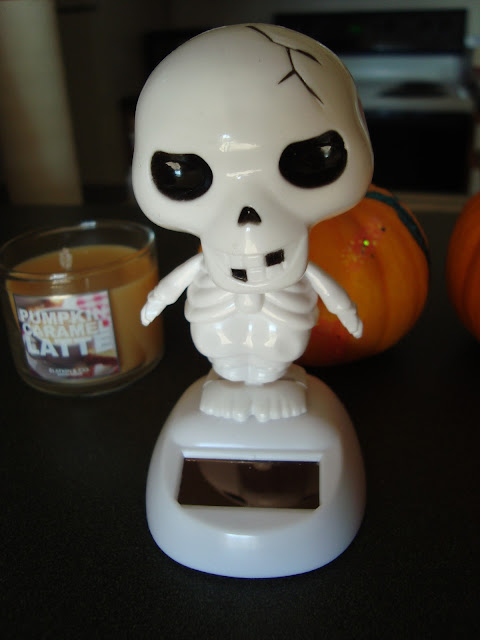
This little guy is a solar powered dancing skeleton. Place he was found: The Dollar Tree. Awesome right???

I also bought some window clings for my room at home (away from Kyle's apartment, I live at home while he's at school, because I have to work... *sigh* adulthood.. ;) ) These were all on one sheet for about 2 bucks. 
Copyright(c)JennyK.

Copyright(c)JennyK.

Copyright(c)JennyK.

Another thing about autumn I love is the food. Thanksgiving is the shit. But aside from delicious mashed potatoes, turkey, ham, rolls, green bean casserole, and pumpkin pie, there's the baking and homemade candy to love!! Now, I've been an avid baker since I was able to safely operate an oven. I've never tried my hand at candy making but decided that this year I'd give it a shot!! 

I decided to try to make these Earl Grey tea infused chocolate truffles and these pumpkin spice caramels. Overall, the endeavor was a success! 

The chocolate truffles were easy to make and turned out deliciously! The only difficulty that I came across was shaping the truffles. I don't have a melon baller and didn't really want to shell out the money for one that I may not need all that often. So I used a spoon and my hands. Haha. It went pretty well. The sizes were a little inconsistent and not all of them were convincingly round - but they were tasty all the same! Also, the cocoa coating was a bit thick on some, but I think I'd get more finesse with more practice. ;) I also had two different kinds of powdered cocoa - true dark and regular, hence the different shades below. 

Copyright(c)JennyK.

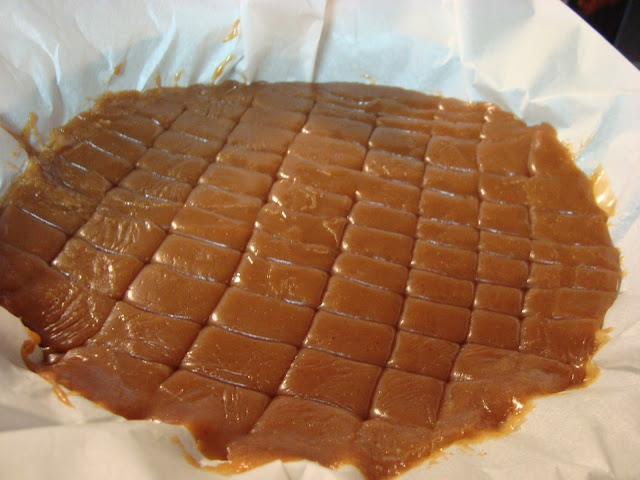
The caramels were more difficult. This was my first experience trying to make what I call "real" candy. This is the kind of candy that takes technique and precision with cook times and temperatures to get the right consistency. My first batch of caramels didn't cook long enough after the cream addition so it was very soft, almost like the caramel topping for ice cream (which is what Kyle used it for later since it was still really tasty!). I decided to try one more batch. This one turned out more evenly mixed and closer to the right consistency but I still missed the mark by a few minutes/degrees. They were still quite soft, too soft to be wrapped up like candies. But we're still gonna be eating my caramel because, though they aren't the caramel chew candies I was aiming for, the flavor is all there! I'm not deterred at all from candy making - I know it takes practice and it's a difficult culinary art. I'll keep you posted on my endeavors in the candy making field! :D

Copyright(c)JennyK.
This is right as the sugar mix was coming to a boil.
Copyright(c)JennyK.
This is during the boil down with the cream mixture added. 
Copyright(c)JennyK.
This is a picture of my second batch after it cooled. (I didn't have a 8" square pan, haha)
Do you like fall or do you hate that summer is over 'til next year? How do you  celebrate or prepare for fall and the onset of winter?

Anyway, those are my fall adventures thus far! I will probably be posting again about others - looking like I might go to a haunt in town with my cousin and I'll probably post about Thanksgiving food, because, well, I love Thanksgiving food. 

Until then, stay excellent! 
- Jenny -

Saturday, September 29, 2012

2012: The Wedding Invasion

This year has been a busy year for a lot of people, it seems. I have noticed it not just in my life, but in the lives of my close friends and family and also in the lives of my past friends and acquaintances (Thanks go out to Facebook for allowing us all to creep on each other). And I have noticed something....

2012 is a year of Wedding Invasion.

Like, seriously, I can think of at least 10 people I know or have known closely that got married this year or are to be married before the year is out, just off the top of my head.

O.o

I sometimes think about it and it gives me the willies like thinking about infestations will do for most people.

Now, don't get me wrong - I'm a hopeless romantic at heart and love a good love story and happily-ever-after as much as the next Disney-story-loving, wedding-pinterest-board-owning, daydreaming girl. BUT holy shit, it's a lot of weddings. I was even in one, for goodness' sake.

Granted, I am at that age where everyone and their dog is trying to get hitched. Early to mid 20's are prime tying the knot ages for many a couple. It's perfect for many, because people in my age group are "just starting the lives": they just graduated from college, they've been dating their significant other for a few years now, they're getting ready to settle into the hum-drum of adult working life, start their own life, and begin the journey of creating a family. What better thing to do than sign the line and get hitched??

But, then again, I'm glad I didn't join that crusade for marriage this year. I wouldn't want to share my anniversary year with so many people so close to my age... or with so many people I know so closely.
It's a selfish desire - but I really want my wedding and following anniversaries to be as unique to me as they can be and so that means trying to separate my wedding date as far from people who are in similar life situations and stages as me as possible.

Aside from this, I do wish all my wedded friends and acquaintances sincere congratulations - Marriage is a big deal and cause for fabulous and wondrous celebration! You have found love and solidified it from now until you part.

I will say this, though, having so many weddings occur has given me a wide variety of weddings to observe and thus given me a lot notes-to-self regarding my own. I'm sure I'll share more of them some time (probably when it's more applicable to my current life situation), but I'll just list a couple here:
  • I won't be buying my dress from David's Bridal. They're too commercialized and they're not nearly organized enough to fit their claim of being wedding experts. Not only that, but like I said before, I want my wedding to be unique. I want to prevent anyone from walking into a bridal store and saying "Oh, that's the dress Jenny wore for her wedding." My dress is going to be mine as much as it can be. I'm not saying I want a custom dress - that's too pricey for something I'll only wear once. But I definitely don't want to support the wedding dress monopoly that is David's Bridal. I'll be supporting local bridal boutiques and I'll have my mom alter my dress - both of those things are more personal to me and my community. Just the way I'd like it. 
  • I will be paying for my bridesmaids' dresses. They accepted the invitation to be in my wedding as a kindness to me. They will also be needing to make arrangements for accommodations, travel, and other expenses galore. It's the least that I can do & I don't care if it's not tradition. 
And now for some inspiring wedding ideas, that I have found via Pinterest (of course), that I hope to maybe incorporate into my wedding in my own way. I've got this idea of a "tree wedding" running around in my mind, I think it's a great theme and it suits me well. I love trees and the symbolism of them (but that's a whole other blog post, I think! :) )


  1. Tree branches with names or initials carved in a heart - centerpieces. Great way to use the remains of a tree someone removed from their land. via stylemepretty.com here.
  2. A must-do photo of the bride and her dog. I love this. via stylemeprettycom here.
  3. Thumbprint guestbook tree. Thumbprints for leaves, names/messages signed on the leaf. Perfect. via August & After at augandevertyhingafter.blogspot.com here.
  4. Bridal bouquets utilizing succulents. One way to have a more eco-friendly wedding. Many more ideas and beautiful pictures of eco-friendly wedding ideas via ruffledblog.com here.
  5. Using part of a tree trunk as the cake stand (using more of that felled tree!). via aubreyreneephotography.com here.
  6. Little baby tree saplings as wedding favors. Encourage people to plant a tree. Saving the world one tree at a time. Love it. via bridalhood.blogspot.com here.
I've been laughed at for my idea of a tree wedding & honestly, I can't see why. I'm still fully sold on the premise. Do you fancy a cool theme? Have you been to a wedding that was fabulously set up? One that was less fabulous? 

Thank you for indulging in this silly little observation of life and wandering down the topic of weddings. It was more of just word-vomit on the subject, but in friendship, sometimes that what you talk about: just simple thoughts and observations. 

May the road rise up to meet you, friend.
Hopefully, it won't be so long until my next post as it was since my last. 

Stay excellent!
- Jenny - 
Sunday, September 9, 2012

Up on My Soapbox about Suicide Prevention

It surrounds the World Suicide Prevention Day of September 10th.

http://lifeandlovequotes.xanga.com/716395125/twloha3/
There are a lot of misconceptions and incorrect ideas about suicide and depression out there, especially on the internet. For some trustworthy facts, I would send you to the non-profit movement To Write Love on Her Arms (TWLOHA), to Suicide Awareness Voices of Education (SAVE), or to the American Foundation for Suicide Prevention (AFSP). To read a little blurb about the mission of these various organizations I have below the mission statement of TWLOHA from their Vision page.
"To Write Love on Her Arms is a non-profit movement dedicated to presenting hope and finding help for people struggling with depression, addiction, self-injury, and suicide. TWLOHA exists to encourage, inform, inspire, and also to invest directly into treatment and recovery."
I have supported TWLOHA for about five years by purchasing t-shirts and helping to spread a better understanding of depression and suicide.

Though I have not personally endeavored through depression or thoughts of suicide, I have been the one to stand between someone I love and his/her bitter, cold end. I was what my loved one called "the only reason" he/she did not commit suicide.

Having been that close to the issue, having had my heart on the line for this issue, yet still having the distance from it to not be the one considering giving in - this has given me a strong passion for suicide prevention.

I cannot emphasize enough what a serious topic this is. 
It infuriates me when people take it lightly, joke about it, or otherwise demean the issue.

For example, I have personally been told to "buy a gun and one bullet" by someone who was angry with me over something inconsequential. When I tried to interpret this order and give the person the benefit of the doubt (saying to myself, they couldn't have meant what they said), the person continued to stand by their statement. So I realized, I had been told to go commit suicide.

Now, I am in no danger of ever taking an order or threat such as this seriously. I am a calm-waters and smooth-sailing kind of personality and the struggles that I've seen have given me strength in myself.
But what if, this wasn't said to me?
And I know that this isn't a what-if scenario - people are told to kill themselves all the time. Most of the time,  the people who say it don't mean it. But that doesn't change the fact that we as a society make light of this dark issue, this real problem. It doesn't change the fact that people go around telling other people to kill themselves.

If I can't get you to feel so strongly about suicide prevention to personally involve yourself in the movements and the work being done to fight it, then I hope to at least get you to feel strongly about the fact that suicide isn't funny or a joke or fake. Suicide and depression are REAL.

They're real issues affecting real people with real families and friends.
They're real issues that take real lives.

You don't have to volunteer at a Suicide Prevention event or hotline.
You don't have to buy a t-shirt (though, they are pretty sweet).
You don't have to donate your money to the causes.
You don't have to be the one chasing people down to tell them that they don't need to take their own lives.

All you have to do is to understand, to feel, to love.
Just know that suicide happens. Know that depression has real consequences.
And know the people just like you, just like your parents, just like your siblings, just like you grandparents, just like your friends - people like the people you love are suffering in one way or another from depression, addiction, self-injury, and suicide and they need our support. 

Take a moment this week to pray for, to think about, to consider, and to learn about the people who suffer and the people who are trying to help.

Knowledge is power and the more people that understand the more inviting and welcoming the world will be for these people who are considering leaving it for good.

Spread the love and think twice about what you say.
Stay excellent.
- Jenny -

http://a1.ec-images.myspacecdn.com/images01/48/ef42a9415b2a8631a3673f4abf149c70/l.jpg

http://www.twloha.com/blog/join-twloha-for-national-suicide/

Sunday, August 26, 2012

DIY: KitchenAid Mixer Makeover

The KitchenAid mixer.
I have been wanting one of my own for quite some time. It's like the swiss army knife of the kitchen appliance world.

Since they have come out in so many colors and styles - I have been eyeballing the fabulous paints and finishes with glee, picturing myself and my KitchenAid.

Earlier this year, I had the fortune of having a friend gift me her old KitchenAid mixer - I was excited!
But there were a few things that needed to be tweaked on this mixer to make me love it like I had imagined in my warm, fuzzy daydreams of me and my KitchenAid happily whiling hours away in the kitchen together.It wasn't the mixer I wanted, but I wasn't going to disregard a perfectly good, working KitchenAid just because it was in need of a new paint job and some cleaning! That's just a waste of money!

I forgot to take a "Before" picture in all the excitement of finally getting a chance to get to work on my KitchenAid's makeover.
So a brief description will have to do - It was the classic, traditional white KitchenAid. Being a used KitchenAid, it had flour and stuff caked on it and a splotchy area on the base where the white paint had been stained.

Needless to say - it, at the very least, needed a good scrub down. But I have always said that I wanted a KitchenAid that was not white.

Hence - The KitchenAid Makeover!

Picture the used white mixer I described...
Here's what it looks like now!!


It's now a fully cleaned, two-tone hammered-finish metallic gray and black gloss like-new mixer. 
My KitchenAid. 

And here's how I gave my mixer its makeover:

Step 1: Unplug the mixer.
Step 2: Remove back panel, attachment connector cover, bowl stand base-plate, and mix speed/logo plate. 
Step 3: Clean the entire mixer and I mean, entire. When I lifted the base-plate for the bowl - it was scary. It took me over half an hour to clean under there. It was some crazy sticky stuff - I used a lot of Dawn on that. 

Here are some pics. The screws are pretty easy to find and loosen - I had no troubles. 


I also removed the black plastic screws to clean the flour and gunk that had gotten under there. Be warned there is a spring under those screws and it will spring out if you're not careful. In case that happens to you and you need to reassemble the screw assembly, this is what it looks like properly assembled: 


Step 4: Sand the painted surfaces of your mixer. You want to sand enough to disrupt the glossy finish. This will help the new coats of paint adhere to the surface. Don't forget the cover for the back panel!


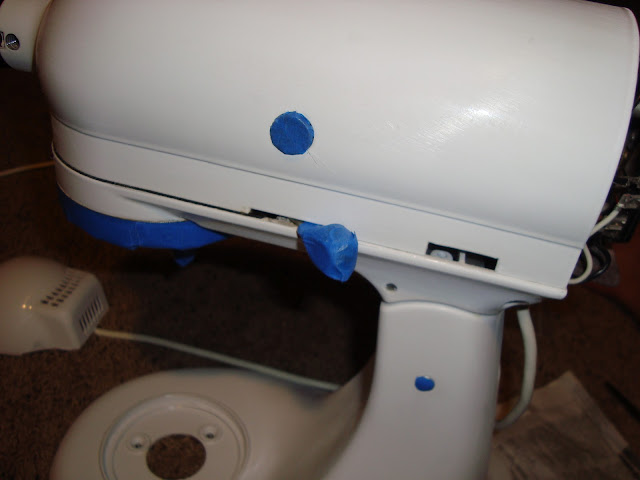
Step 5: Use painter's tape to cover any portions you don't want painted like the control knobs, the silver accent above the mixing arm, the mixing arm itself, etc. Also cover the exposed wiring on the back of the mixer. I cut the zipper part off of a sandwich baggie and used the tape to secure it. I also covered the screws on the sides of the top portion of the mixer as well as on the base of it. I wanted to maintain that from-factory look by keeping the silver screws on the bottom unpainted. I covered each with tape and the cut the excess tape off with a knife. 


Step 6: Whether you are painting yours two-tone like I did or if you are painting it all one color, be sure to cover up the portion of the mixer that is not being painted while you paint the opposite part. For example: If you paint the top first, cover the base while you paint it. And vice versa. If you don't do this, when you go to paint the portion you didn't paint the first time, the part that is already painted will be dusted with another coat of paint - disrupting that smooth, glossy factory-like finish. 


Step 7: Paint the first portion of the mixer! 

A note about paints to use: There are appliance epoxy spray paints that are specially formulated to look just like the factory finish. I used this on the bottom portion of my mixer. For the top of mine, I wanted something more unique. Those appliance epoxy paints only come in common appliance colors (white, black, almond, etc.). The unique colors like red, orange, green, gray - those aren't available. However, any oil-based spray paint will do the job. Isn't that fabulous?? In case you didn't know - the majority of spray paints are oil-based. If they are not oil-based they will be marked as such. This opens up literally hundreds of colors and textures! I chose the Rust-oleum hammered finish gray paint for my top half:


Step 8: When finished, peel the tape off of the covered items and remove the covering for the base - to prevent the tape from being sealed onto the mixer once the paint dries. 
Step 9: Allow to dry completely. 
Step 9.5: Paint the back panel cover and allow to dry completely. 
Step 10: Once the top half (or whatever part you painted already) has dried, cover it. Also, wrap up the cord and cover it in a plastic bag. Tape up cord where it sticks out of the bag and meets the mixer so that none of the cord is uncovered. Tape the bagged cord so that it hangs up off of the base and the floor, taped to the covering of the top portion of the mixer. This will prevent the cord from disturbing the paint on the base by touching it. 
Step 11: Paint the remaining portion. 


As you might have noticed, I decided to change where the gray and the black paint met on my mixer. When I started I forgot that I wanted the color to change at the mix speed label so that above it was gray-silver and below it was black. I remembered this and taped off the mixer appropriately and painted over some of the gray-silver from my first painting session. No harm, no foul. ;)

Step 12: Once the paint has begun to dry a little, remove the tape and the bag from the mixer, carefully. Be sure to prop the cord up so that it does not touch the painted surfaces while it is drying. 
Step 13: Allow to dry completely.
Step 14: Reattach all pieces that were removed in the beginning. 
Step 15: Enjoy! 

Now, I'm sure some of you will want to find a way to recolor the cord to match (I know I wanted to do it). But you can't just spray paint that too, unfortunately. Because the cord is flexible and because of its material, spray paint won't stay adhered to it. You'll need to purchase a sort of dye to recolor the cord material - I've read about vinyl dyes doing the trick in other applications - but it seemed like a lot of work for me, just to repaint the cord. I'm fine with it being white. But in case, it really bothers you, there are options! I just did a quick google search about it, I'm sure you could dig something up with more detail. :) 


Now my KitchenAid and I can truly say that we belong together. :) 

Here's hoping that I've inspired you in some way or helped you make something you have into something you love. :) 

Happy DIY-ing!
Stay excellent!
- Jenny -