The KitchenAid mixer.
I have been wanting one of my own for quite some time. It's like the swiss army knife of the kitchen appliance world.
Since they have come out in so many colors and styles - I have been eyeballing the fabulous paints and finishes with glee, picturing myself and my KitchenAid.
Earlier this year, I had the fortune of having a friend gift me her old KitchenAid mixer - I was excited!
But there were a few things that needed to be tweaked on this mixer to make me
love it like I had imagined in my warm, fuzzy daydreams of me and my KitchenAid happily whiling hours away in the kitchen together.It wasn't the mixer I wanted, but I wasn't going to disregard a perfectly good, working KitchenAid just because it was in need of a new paint job and some cleaning! That's just a waste of money!
I forgot to take a "Before" picture in all the excitement of
finally getting a chance to get to work on my KitchenAid's makeover.
So a brief description will have to do - It was the classic, traditional white KitchenAid. Being a used KitchenAid, it had flour and stuff caked on it and a splotchy area on the base where the white paint had been stained.
Needless to say - it, at the very least, needed a good scrub down. But I have always said that I wanted a KitchenAid that was
not white.
Hence - The KitchenAid Makeover!
Picture the used white mixer I described...
Here's what it looks like now!!
It's now a fully cleaned, two-tone hammered-finish metallic gray and black gloss like-new mixer.
My KitchenAid.
And here's how I gave my mixer its makeover:
Step 1: Unplug the mixer.
Step 2: Remove back panel, attachment connector cover, bowl stand base-plate, and mix speed/logo plate.
Step 3: Clean the entire mixer and I mean, entire. When I lifted the base-plate for the bowl - it was scary. It took me over half an hour to clean under there. It was some crazy sticky stuff - I used a lot of Dawn on that.
Here are some pics. The screws are pretty easy to find and loosen - I had no troubles.

I also removed the black plastic screws to clean the flour and gunk that had gotten under there. Be warned there is a spring under those screws and it will spring out if you're not careful. In case that happens to you and you need to reassemble the screw assembly, this is what it looks like properly assembled:
Step 4: Sand the painted surfaces of your mixer. You want to sand enough to disrupt the glossy finish. This will help the new coats of paint adhere to the surface. Don't forget the cover for the back panel!
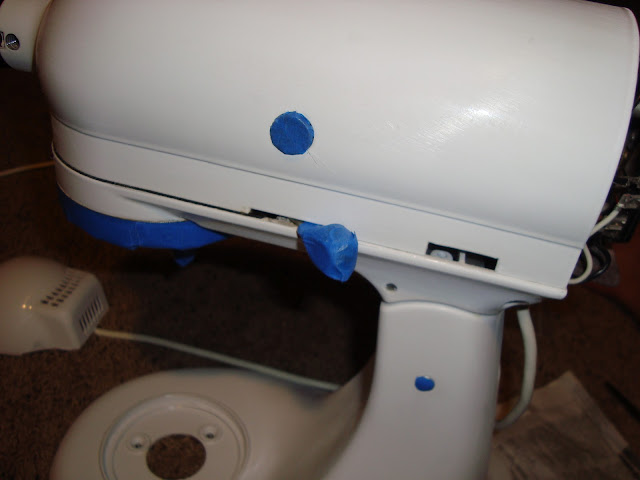
Step 5: Use painter's tape to cover any portions you don't want painted like the control knobs, the silver accent above the mixing arm, the mixing arm itself, etc. Also cover the exposed wiring on the back of the mixer. I cut the zipper part off of a sandwich baggie and used the tape to secure it. I also covered the screws on the sides of the top portion of the mixer as well as on the base of it. I wanted to maintain that from-factory look by keeping the silver screws on the bottom unpainted. I covered each with tape and the cut the excess tape off with a knife.


Step 6: Whether you are painting yours two-tone like I did or if you are painting it all one color, be sure to cover up the portion of the mixer that is not being painted while you paint the opposite part. For example: If you paint the top first, cover the base while you paint it. And vice versa. If you don't do this, when you go to paint the portion you didn't paint the first time, the part that is already painted will be dusted with another coat of paint - disrupting that smooth, glossy factory-like finish.
Step 7: Paint the first portion of the mixer!
A note about paints to use: There are appliance epoxy spray paints that are specially formulated to look just like the factory finish. I used this on the bottom portion of my mixer. For the top of mine, I wanted something more unique. Those appliance epoxy paints only come in common appliance colors (white, black, almond, etc.). The unique colors like red, orange, green, gray - those aren't available. However, any oil-based spray paint will do the job. Isn't that fabulous?? In case you didn't know - the majority of spray paints are oil-based. If they are not oil-based they will be marked as such. This opens up literally hundreds of colors and textures! I chose the Rust-oleum hammered finish gray paint for my top half:
Step 8: When finished, peel the tape off of the covered items and remove the covering for the base - to prevent the tape from being sealed onto the mixer once the paint dries.
Step 9: Allow to dry completely.
Step 9.5: Paint the back panel cover and allow to dry completely.
Step 10: Once the top half (or whatever part you painted already) has dried, cover it. Also, wrap up the cord and cover it in a plastic bag. Tape up cord where it sticks out of the bag and meets the mixer so that none of the cord is uncovered. Tape the bagged cord so that it hangs up off of the base and the floor, taped to the covering of the top portion of the mixer. This will prevent the cord from disturbing the paint on the base by touching it.
Step 11: Paint the remaining portion.
As you might have noticed, I decided to change where the gray and the black paint met on my mixer. When I started I forgot that I wanted the color to change at the mix speed label so that above it was gray-silver and below it was black. I remembered this and taped off the mixer appropriately and painted over some of the gray-silver from my first painting session. No harm, no foul. ;)
Step 12: Once the paint has begun to dry a little, remove the tape and the bag from the mixer, carefully. Be sure to prop the cord up so that it does not touch the painted surfaces while it is drying.
Step 13: Allow to dry completely.
Step 14: Reattach all pieces that were removed in the beginning.
Step 15: Enjoy!
Now, I'm sure some of you will want to find a way to recolor the cord to match (I know I wanted to do it). But you can't just spray paint that too, unfortunately. Because the cord is flexible and because of its material, spray paint won't stay adhered to it. You'll need to purchase a sort of dye to recolor the cord material - I've read about vinyl dyes doing the trick in other applications - but it seemed like a lot of work for me, just to repaint the cord. I'm fine with it being white. But in case, it really bothers you, there are options! I just did a quick google search about it, I'm sure you could dig something up with more detail. :)
Now my KitchenAid and I can truly say that we belong together. :)
Here's hoping that I've inspired you in some way or helped you make something you have into something you love. :)
Happy DIY-ing!
Stay excellent!
- Jenny -


